
For a while now, Sirius has integrated ELK (Eclipse Layout Kernel) to make it easier to define your own custom diagram layouts.
ELK provides several layout styles that can be used directly. But it can also be useful to develop your own layout algorithm to address your specific needs.
As a reminder, ELK provides two things:
- a collection of layout algorithms,
- and an infrastructure that bridges the gap between layout algorithms and diagram viewers and editors.
In this blog, written with the help of Pierre-Charles David, I will present how to use that integration on two concrete use cases: the usage of ELK with a ready-to-use layout algorithm, and the development of a specific one.
Technically the Sirius/ELK integration is still considered experimental as there are still some rough edges and corner cases not supported, so we have not communicated much about it.
But in practice, it is quite usable and can be very useful. And we're continually improving it. So, do not hesitate to try it on your diagrams, and if you find some issues or limitations, please report them so that we can improve this feature.
Summary
As an example, I will be using the modeling tool that illustrates the Sirius Mindstorm tutorial. It allows you to program a Lego MindstormTM robot by specifying a sequence of instructions. With the default "Arrange All" and the few options available in the Viewpoint Specification Model (VSM), a .odesign file where you configure your Sirius diagram, the best you can get on this example is something like:

With the ELK integration, you get new superpowers directly available in your VSM! After developing your own layout you can, for example, allow the specifier to choose the number of elements per line, the space between each line, and the space between each element:

The rest of the article contains 2 sections:
- a first to install and play with the demo,
- a second to go further and discover how to implement your own ELK layout.
Installing and playing with the demo
This section shows how to reuse an existing ELK layout algorithm for the Mindstorms modeler (the result of the Sirius Mindstorms modeler tutorial).
We will reuse a specific ELK layout that we have implemented. Its goal is to display the elements horizontally aligned, like before, but with the capability to configure the number of elements on a line and to create a new line when a given number of elements is reached. This layout allows the specifier to configure:
- the number of elements on a line,
- the space between each line,
- the space between each element.
Here are the steps to follow to be able to execute the demo with this specific ELK layout:
- Install Obeo Designer CE 11.5.0 (version used for this demo)
- Install the "
Sirius ELK Integration - SDK" feature and restart Obeo Designer CE. This feature, compared to "Sirius ELK Integration", contains an additional plug-in with useful debug capabilities.

- Import projects from DefineSpecificELKLayout-workspaceProjects.zip into your workspace:
- the domain model projects
fr.obeo.dsl.tuto.mindstorms,fr.obeo.dsl.tuto.mindstorms.editandfr.obeo.dsl.tuto.mindstorms.editor(same as in solution1.zip of the Mindstorms tutorial), - and the project defining the ELK specific layout definition
fr.obeo.dsl.tuto.mindstorms.layout.
- the domain model projects
- Launch a runtime
- Import projects from DefineSpecificELKLayout-runtimeProjectsForDemo.zip in your runtime:
fr.obeo.dsl.tuto.mindstorms.design: The Viewpoint Specification Project from solution4.zip updated to use the new specific ELK layoutfr.obeo.dsl.tuto.mindstorms.sample: Sample model started from sample.zip but completed with more elements
- Open the sample representation file (
/fr.obeo.dsl.tuto.mindstorms.sample/representations.aird) - Open the diagram "
new choreography diagram without ELK"- The layout is the result of the previous default layout (as in the original Mindstorms tutorial, without ELK: on one line)
- Open the diagram "
new choreography diagram with ELK"- The layout is the result of the specific ELK layout, as described in the introduction.
And now, as the specifier, you are able to configure the layout according to the options defined for this specific layout.
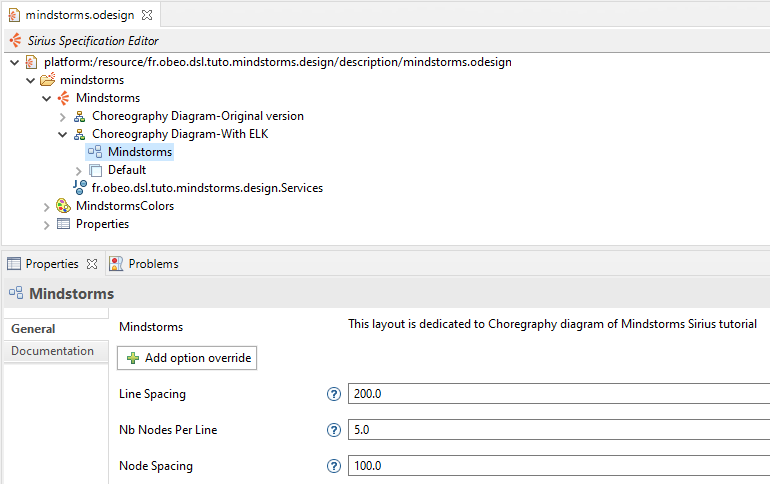
- Open the VSM file:
/fr.obeo.dsl.tuto.mindstorms.design/description/mindstorms.odesign - Select the Mindstorms layout (
mindstorms / Mindstorms / Choreography Diagram-WithELKDemo / Mindstorms) - In the
Properties view, you have access to all the ELK configurations options - Change the configuration of the layout, for example:
Line Spacing = 200Nb Nodes Per Line = 5Node Spacing = 100
- Save the VSM file and directly test the result
- Launch the "
Arrange all" action onnew choreography diagram with ELK- After the first 5 elements, the nodes are displayed on a new line and the space between the lines is bigger.

In this chapter, you installed and played with a defined ELK layout. If you want to go further, you can read the following chapter to discover how to develop your own layout algorithm.
Implement an ELK layout - Step by step
As a reminder, in Sirius, to define your own layout, you can use the classical Sirius/GMF mechanism (see the associated documentation for more details). It relies on GMF, and knowledge about this graphical framework is mandatory to succeed in implementing your own layout in this way. It is not impossible, but difficult.
Since the integration of ELK in Sirius as an experimental feature, you can now use this new way. There is no secret, you need ELK knowledge. But it is simpler to apprehend and the learning curve is quicker than for GMF way. Obeo Designer CE 11.5.0 has been used for the examples shown in this article (including Sirius 6.5.1).
Reading and initialization steps
The first and main step is to develop your own ELK layout. All resources to achieve this are available on ELK Documentation.
In a few words, you have to:
- initialize your layout project
- supply metadata for your layout algorithm
- implement your layout algorithm
Before that, there are interesting readings to:
The following section details how to implement the specific layout of the demo for the Mindstorms modeler step by step. It can easily be adapted to your own Sirius-based modelers.
If you have already installed and played with the demo of the previous section "Install and play with the demo", you can start by:
- deleting the projects from the runtime (
fr.obeo.dsl.tuto.mindstorms.designandfr.obeo.dsl.tuto.mindstorms.sample), - closing the runtime,
- deleting "
fr.obeo.dsl.tuto.mindstorms.layout" of your workspace.
If you have not installed the demo, you can start by:
- installing Obeo Designer CE 11.5.0 (version used for this demo),
- installing "
Sirius ELK Integration -SDK" feature and restarting Obeo Designer CE. - importing domain model projects
fr.obeo.dsl.tuto.mindstorms,fr.obeo.dsl.tuto.mindstorms.editandfr.obeo.dsl.tuto.mindstorms.editorfrom DefineSpecificELKLayout-workspaceProjects.zip in your workspace.- Do not import
fr.obeo.dsl.tuto.mindstorms.layout, it will be created in the next step.
- Do not import
Initialize your layout project
This part is based on the ELK documentation. You can refer to it to get more details.
- Create a new Plug-in project using the template "
Layout Algorithm"


- Edit the build.properties file
- Add
src-gento the source list, - remove
plugin.xmlfrombin.includeslist (probably a bug of the template), - content looks like this:
- Add

- Modify the description of your new layout in
/fr.obeo.dsl.tuto.mindstorms.layout/src/fr/obeo/dsl/tuto/mindstorms/layout/Mindstorms ELK Layout.melk- Replace "
Please insert a short but informative description here" by your specific description. - This description will be visible in the
Properties viewof the VSM file when the layout will be used.
- Replace "
The wizard creates the following elements for you:
- A
MANIFEST.MFfile with the necessary dependencies to theEclipse Layout Kernelso you can use ELK data structures. - A file called
ILayoutMetaDataProviderwhich registers your new layout algorithm with ELK so it can be used next in the Sirius VSM file. This file, in ELK 0.7.0, replaces the previous method that used the Eclipse extension point to register a new layout algorithm. - A
.melkfile which describes your layout algorithm and the options it supports (see this page for more information). - A sample implementation with a simple basic layout provider. Studying this implementation will teach you a lot about how to develop layout algorithms with ELK (see this page for more information).
You can test the default generated implementation (in fr.obeo.dsl.tuto.mindstorms.layout.MindstormsLayoutProvider.layout(ElkNode, IElkProgressMonitor)):
- Launch a runtime.
- Import projects from DefineSpecificELKLayout-runtimeProjectsForTuto.zip in your runtime:
fr.obeo.dsl.tuto.mindstorms.design: Similar Viewpoint Specification Project as solution4.zip.fr.obeo.dsl.tuto.mindstorms.sample: Sample started from sample.zip but completed with more elements.
- Open the VSM
/fr.obeo.dsl.tuto.mindstorms.design/description/mindstorms.odesign. - Add the new defined "
Mindstorms" as layout under the diagram description "Choreography Diagram" (instead of existing "Composite Layout"). - Save the VSM.
- Open the diagram "
choreography diagram" from the sample project. - Launch the "
Arrange all" action. - Expected result: all elements are horizontally aligned, next to each other. Edges are ignored, ie not considered in nodes layout order.
Reuse an existing standard ELK layout option
Several options are "generic" in ELK layout (see this page for all options currently available). To reuse some of them, you have to declare them in fr.obeo.dsl.tuto.mindstorms.layout.options.MindstormsOptions.
In the default generated implementation, four options are reused:
- Padding (org.eclipse.elk.padding)
- Edge Spacing (org.eclipse.elk.spacing.edgeEdge)
- Edge Node Spacing (org.eclipse.elk.spacing.edgeNode)
- Node Spacing (org.eclipse.elk.spacing.nodeNode)
They are visible in /fr.obeo.dsl.tuto.mindstorms.layout/src/fr/obeo/dsl/tuto/mindstorms/layout/Mindstorms ELK Layout.melk in the algorithm section with tag supports.
These options are available in the VSM file (with the button Add option override). They will be tested later, in the section "Implement the layout algorithm", after some specialization.
For our current needs, we only kept the option org.eclipse.elk.spacing.nodeNode to determine the horizontal space between 2 nodes. And we set a default value of 50 pixels.
If you want to go further and get more details about the options, you can have a look at this page.
Add a specific option
It can be useful to describe a new option, specific to our layout, ie not generic. For example, in our case, we want to define:
- the number of elements in a line,
- the vertical space between each line.
In the default generated implementation, one new option is defined: reverseInput. We delete it and replace it with the 2 above options:
group spacing {
    option line: double {
        label "Line Spacing"
        description
            "The spacing to be preserved between any pair of nodes of two adjacent lines.
            Note that 'spacing.nodeNode' is used for the spacing between nodes within the line itself."
        default = 30
        lowerBound = 0.0
        targets parents
    }
}

group nodePlacement {
    option nbNodesPerLine: double {
        label "Nb Nodes Per Line"
        description
        "The number of nodes to display per line"
        default = 4
        lowerBound = 1.0
        targets parents
    }
}
These new options are then added as supported options, like the previous reused options, in the algorithm part:
algorithm Mindstorms(MindstormsLayoutProvider) {
    ...
    // Specific spacing
    supports fr.obeo.dsl.tuto.mindstorms.layout.spacing.line
    // Specific properties
    supports fr.obeo.dsl.tuto.mindstorms.layout.nodePlacement.nbNodesPerLine
}
After the above sections, the melk file content looks like this:
/**
 * Copyright (c) 2021 Obeo
 * This program and the accompanying materials
 * are made available under the terms of the Eclipse Public License 2.0
 * which accompanies this distribution, and is available at
 * https://www.eclipse.org/legal/epl-2.0/
 *
 * SPDX-License-Identifier: EPL-2.0
 *
 * Contributors:
 * Obeo - initial API and implementation
 */
package fr.obeo.dsl.tuto.mindstorms.layout

import fr.obeo.dsl.tuto.mindstorms.layout.MindstormsLayoutProvider

bundle {
    metadataClass MindstormsMetadataProvider
    idPrefix fr.obeo.dsl.tuto.mindstorms.layout
}

/* ------------------------
 * spacing
 * ------------------------*/
group spacing {
    option line: double {
        label "Line Spacing"
        description
        "The vertical spacing to be preserved between each line, between the lowest node of the upper line and the highest node of the lower line.
        Note that 'spacing.nodeNode' is used for the spacing between nodes within the line itself."
        default = 30
        lowerBound = 0.0
        targets parents
    }
}

group nodePlacement {
    option nbNodesPerLine: double {
        label "Nb Nodes Per Line"
        description
        "The number of nodes to display per line."
        default = 4
        lowerBound = 1.0
        targets parents
    }
}

algorithm Mindstorms(MindstormsLayoutProvider) {
    label "Mindstorms"
    description "This layout is dedicated to Choregraphy diagram of Mindstorms Sirius tutorial"
    metadataClass options.MindstormsOptions
    supports org.eclipse.elk.spacing.nodeNode = 50
    documentation "Used as horizontal node spacing"
    // Specific spacing
    supports fr.obeo.dsl.tuto.mindstorms.layout.spacing.line
    // Specific properties
    supports fr.obeo.dsl.tuto.mindstorms.layout.nodePlacement.nbNodesPerLine
}
Implement the layout algorithm
The layout algorithm is not detailed here. You can directly copy the class fr.obeo.dsl.tuto.mindstorms.layout.MindstormsLayoutProvider of project fr.obeo.dsl.tuto.mindstorms.layout in DefineSpecificELKLayout-workspaceProjects.zip. This class contains comments to document what is done.
Test the layout
- Launch a runtime, it always contains projects imported in the section "
Initialize your layout project". - Open the VSM
/fr.obeo.dsl.tuto.mindstorms.design/description/mindstorms.odesign. - Under the diagram description
Choreography Diagram,select the layoutMindstorms. - You can change the value of the options "
Line Spacing", "Nb Nodes Per Line" and/or "Node Spacing". - Save the VSM.
- Open the diagram
choreography diagramfrom the sample project. - Launch the
Arrange allaction. - Expected result: all elements are horizontally aligned, with the number of nodes set in the option (or 4 by default), and the edges link the nodes to each other with a loop from each end of line to the following one.

You have succeeded to implement your own layout and to use it in Sirius. You have the same result as the initial demo.
Disclaimer: C1 is a container and not a simple node. It is not specifically handled by our algorithm and a "default layered algorithm" is used. If you launch the "Arrange all" several times, the result is not constant because the size of the container is increased each time.
Going Further
You are now ready to develop your own layout. Do not hesitate to read the ELK documentation for complementary information.